5May, 2020
Complete Guide to Deployment Automation of Your Scaled Sitecore Environment Using Azure Devops and Hedgehog TDS
I'll be writing a few articles about deployment automation as there's so many ways to accomplish this. Today, we're going to have Azure Devops trigger a Build Event in Visual Studio, which pushes a Sitecore package to our instances so Hedgehog's Sitecore Package Deployer uses it. But before using this process we need to download and install the package deployer.
Installing the Package Deployer
This installation uses the update installation wizard, so if you're not familiar with it I'll cover this briefly.
Vist /sitecore/admin/UpdateInstallationWizard.aspx in each of your Sitecore instances to perform this installation. They all need this. Select the package you just downloaded and run through the steps which are very self-explanatory.

This wizard will give you a rundown of everything installed in its progress window.

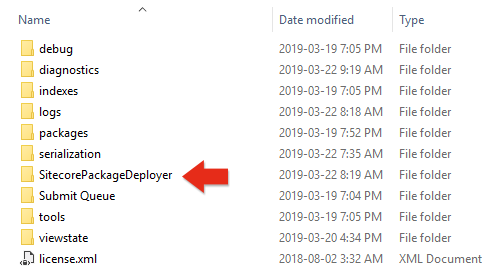
Once the installation is complete you'll see a new folder in your Sitecore Data folder called SitecorePackageDeployer. This is the location our updates need to be copied which we'll cover in the next section.

Configuring the Deployments
Everything starts with an automated build started by version control. It really doesn't matter which tool you're using for your version control, but the important point about it in this exercise is that you have some form of strict branch management around what will trigger this build. In our organization we use the following convention:
- Developer creates branch named /sprint-1/XX/T1234-description, where XX is their initials and T1234 is a work management ticket number (T for Task, B for Bug, etc.).
- The developer then creates a pull request for this branch to be merged into /sprint-1. The branch policies require that a successful build completes and that at least one other developer reviews the changes and approves them.
- A pull request is made when /sprint-1 is ready for deployment to the QA environment. This pull request will also require the same reviews as the above one.
There are more steps to getting our code into Master but we'll stop here as this is all we need for now. Once the pull request has been completed for QA, the QA branch itself gets updated with new code which in turn starts a specific build, which we of course call QA. The QA build also uses a specific build configuration in visual studio, again, called QA. This is where our automation really starts.
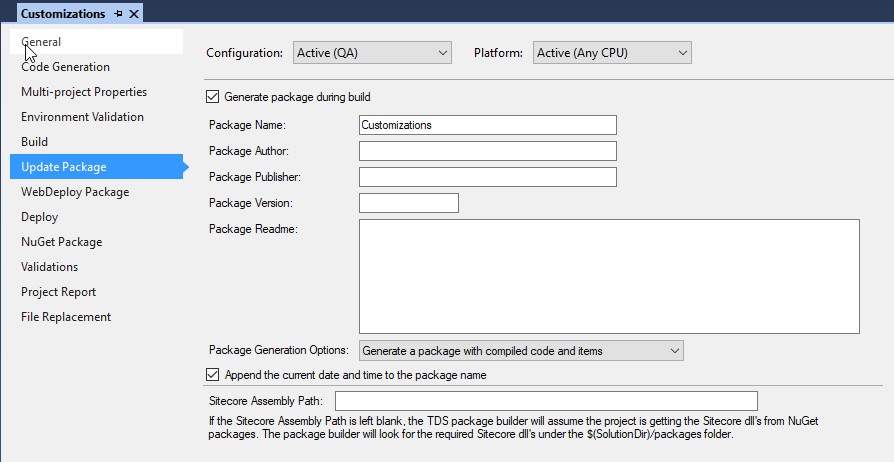
Here you can see we've set up our TDS project (named Customizations) to create an update package, so that means when the QA build configuration executes we'll see a new file created in \Customizations\bin\Package_QA\ named similar to Customizations_20190324_0921.update.

We need the Customizations_20190324_0921.update package deployed to our Sitecore instances, so visual studio has a post-build event to copy this new file over:
xcopy "$(SolutionDir)Customizations\bin\Package_QA" "\\QA-01-CM\Data\SitecorePackageDeployer"
xcopy "$(SolutionDir)Customizations\bin\Package_QA" "\\QA-01-PROC\Data\SitecorePackageDeployer"
xcopy "$(SolutionDir)Customizations\bin\Package_QA" "\\QA-01-CD1\Data\SitecorePackageDeployer"
xcopy "$(SolutionDir)Customizations\bin\Package_QA" "\\QA-01-CD2\Data\SitecorePackageDeployer"
The Sitecore Package Deployer will run once a minute, checking to see if anything new is in the "Data\SitecorePackageDeployer" folder, and if something is found the update process starts. What I really like about using this tool is that during the installation the config files are installed automatically,so there's no need to go in and activate updated ones in a post-deploy step. Once complete you'll see the update file is gone and replaced with a json file of the same name, and looking inside we see a bit of important information:
{"Status":"Success","ServerName":"SITECORE-82","DeployHistoryPath":"C:\\Inetpub\\wwwroot\\Sitecore82\\Website\\temp\\__Upgrade\\Upgrade_20190324T145200370"}
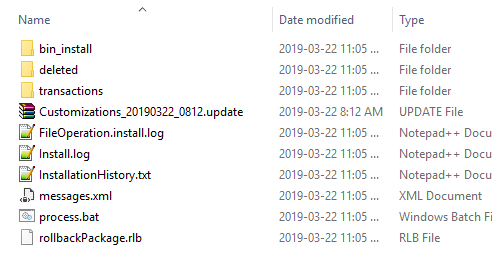
This new folder will have the deployment information that can be useful to you. When looking in one of these folders we see the following files which includes the original update package and a log detailing the execution.

The following log shows a simple demo installation which includes item and file installation. If a restart is required the installation continues post-restart.
Installing item '/sitecore/content/Home/Events'
Installing item '/sitecore/content/Home/Events/Event 1'
Installing item '/sitecore/content/Home/Events/Event 2'
Installing item '/sitecore/content/Home/Events/Event 3'
Installing file '_DEV\DeployedItems.xml'
Preparing to install file 'App_Config\Include\DemoConfigs\CustomLogDemo.config'
Preparing to install file 'App_Config\Include\DemoConfigs\ScheduledTaskDemo.config'
Installing file 'bin\HedgehogDevelopment.SitecoreProject.PackageInstallPostProcessor.dll'
Installing file 'bin\SitecoreFundamentals.Demos.dll'
Copying files to be installed to solution and backing up overwritten files
Executing Post Installation instuctions: 'HedgehogDevelopment.SitecoreProject.PackageInstallPostProcessor.DoPostDeployActions,HedgehogDevelopment.SitecoreProject.PackageInstallPostProcessor.dll'
2019-03-24-10:52:28 AM: Starting PostDeployActions. Using assembly version 5.8.0.0
2019-03-24-10:52:28 AM: Recursive deploy action is set to ignore
2019-03-24-10:52:28 AM: TDS PostDeployActions complete.
And that's it! Your scaled environment is updated and there are no post-deploy steps required. Since Sitecore 9 you also don't have to worry about enabling role-specific configuration files as it's now handled with role-based configurations!


