
25Nov, 2020
How to Add Custom Buttons to the Content Editor Ribbon
I was recently asked to provide a way for a User to execute a scheduled task immediately instead of waiting for the next scheduled run. Adding a button inside the Content Editor was a useful way to accomplish this, and since I found a few misleading guides online I thought I'd post my own, which is hopefully a lot clearer.
For this example, we'll execute the Sitecore.Foundation.Integrations.Tasks.MNP.Run method from a custom button. Why MNP you ask? Well, it's where I work! :)
There's just a bit of item creation to get this accomplished, but since this requires reference fields to be set, we'll start at the bottom and work out way up.
The Content Editor ribbon is made up of the following:
- Tabs - The Home, Navigate, Review, Analyze, Publish, etc. tabs at the top.
- Strips - Each Tab contains a Strip, which is a container for the relevant Chunks.
- Chunks - As you can see below, the Home Tab has Chunks such as Write, Edit, Insert, etc., which groups buttons.
- Buttons - Buttons are contained in the Chunks, which are contained in the Strips, which are contained in the Tabs. Get it?

Creating the Items
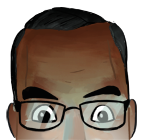
So, to make things simple we build in the order of dependency, starting with making a Chunk (/sitecore/templates/System/Ribbon/Chunk) called "Integrations" in "/sitecore/content/Applications/Content Editor/Ribbons/Chunks". You can see that I've set the Header field to the text I want to have appear below the buttons.
The next thing to create is the actual Button as a child of this new Chunk, which is based off the template “/sitecore/templates/System/Ribbon/Large Button” in this case. The following fields should be set:
- Header - The text that will appear with the Button.
- Icon - Any Icon you prefer to use for this Button.
- Click - We'll get to the code in a minute, but this is going to point to a Command. I am setting this field to “mnp:import”.
- Tooltip - Gives the User some guidance on what the Button does.

Now that the Chunk and Buttons are complete, we want to create the Strip we will need under “/sitecore/content/Applications/Content Editor/Ribbons/Strips” using template “/sitecore/templates/System/Ribbon/Strip”. Then a child of this new item is created using the template “/sitecore/templates/System/Reference”, with the Reference field pointing to the Chunk we just made.

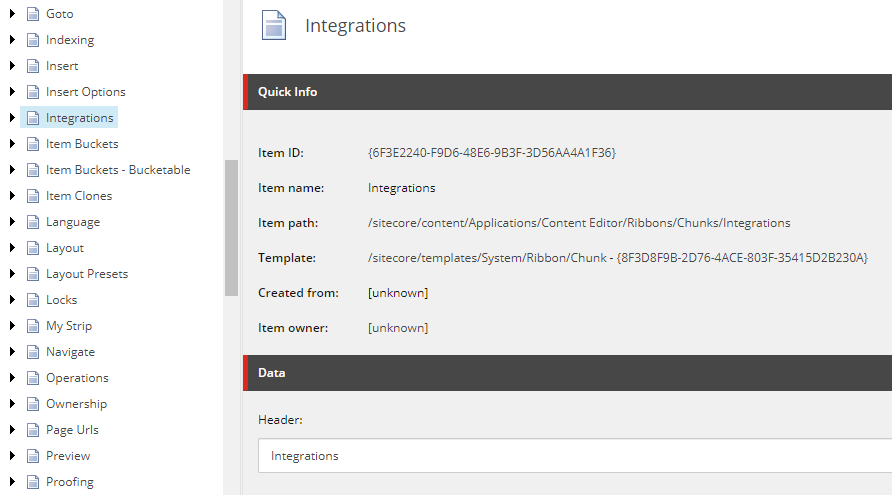
Finally, create a new Tab under the “/sitecore/content/Applications/Content Editor/Ribbons/Ribbons/Default” item, of type “/sitecore/templates/System/Reference”. The Reference field on this item points to the Strip that was just created.
Don't see the new button yet?
This is expected. Like the Developer Tab, to see this new button you need to right click on the toolbar and choose the MNP tab.

But Wait, There's More
Yeah, we need some code to support this button. It's not much though!
Remember the Click field on the Button? We need to patch Sitecore for that value, using a configuration similar to this:
  <sitecore>
    <commands>
      <command name="mnp:import" type="Sitecore.Foundation.Integrations.Tasks.RunImportImmediately,Sitecore.Foundation.Integrations"/>
    </commands>
  </sitecore>
And the code this points to is pretty straightforward:
public class RunImportImmediately : Command
    {
        public override void Execute(CommandContext context)
        {
            MNPImport mnpImport = new MNPImport();
            mnpImport.Run();

            SheerResponse.Alert("MNP import task has completed.", new string[0]);
            return;
        }
    }
Let's See It in Action!
Here you can see the new button and the Tooltip we have given it.

Once clicked, the message from the Alert in the above code is sent to the User, and we're done!