

28Jan, 2021
Replacing Your Ssl Certificate in a Standalone Sitecore Environment
If you've read my article, Providing External Access for the Xp Single Developer Installation, you'd know there was some certificate work to be done. Well, today's the day I need to replace these certs with new ones. Exciting isn't it? Not really, but let's walk through the steps together.
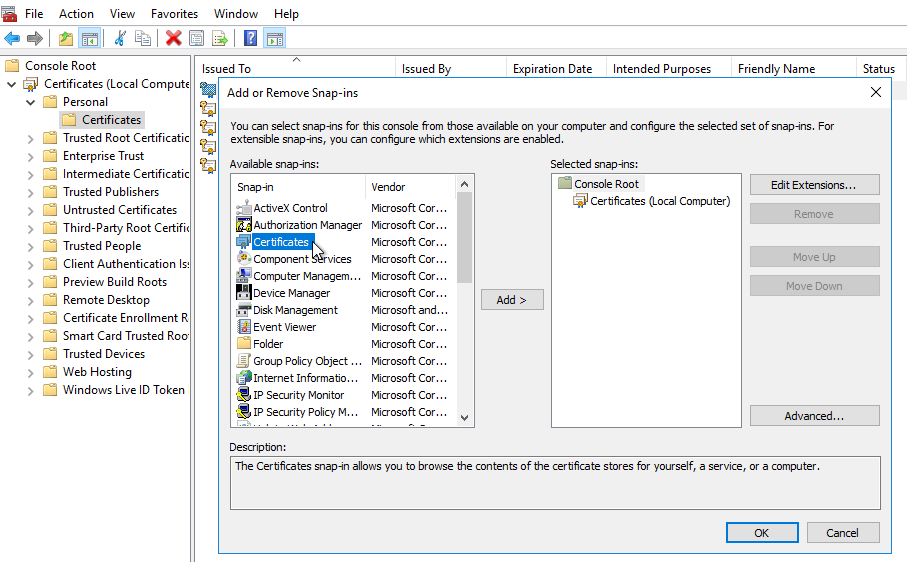
- In your Sitecore VM/Server, open mmc.exe.
- Go to File -> Add/Remove Snap In.
- Add Certificates and choose Computer account -> Local computer.
- When you see this under your Console Root, expand it then Personal and then Certificates.
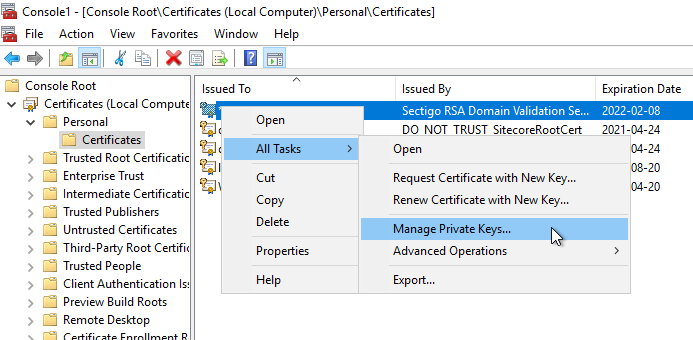
- Double click on your existing certificate, then open the Details tab and scroll to the bottom to see Thumbprint. Save this thumbprint, removing the spaces, in notepad for reference throughout this exercise. The value is case sensitive, so do not change it from what you see here.
Now that you have the current certificate thumbprint you can search for all xml and config files that would have it. The files you find should be:
- dev.identityserver\Config\production\Sitecore.IdentityServer.Host.xml
- dev.site\App_Config\ConnectionStrings.config
- dev.xconnect\App_Config\AppSettings.config
- dev.xconnect\App_Data\jobs\continuous\ProcessingEngine\App_Config\ConnectionStrings.config
- dev.xconnect\App_Data\jobs\continuous\AutomationEngine\App_Config\ConnectionStrings.config
The Certificate Swap
Install your new certificate per standard procedures and ensure it's seen in the same Certificates area from the steps above (you'll have to refresh that pane). Get the new certificate's thumbnail in the way as above, remembering to remove spaces and save for later.
Open IIS and get the App Pool name for each of the three sites. Mine are:
- dev.site
- dev.identityserver
- dev.xconnect
Back in your console, right click on the new certificate and choose All Tasks -> Manage Private Keys, and add all three app pool identities. Remember to prefix these accounts with iis apppool\, so you would be entering “iis apppool\dev.site”, and so on. Once the three application pools are added, you need to also add "Local Service" since xConnect's services use this account as well.
Your new certificate is ready for use in IIS! I recommend removing the old certificate at this time, so the next steps are easier. Maybe the old and new certificates have the same name or something. That was the case with me.
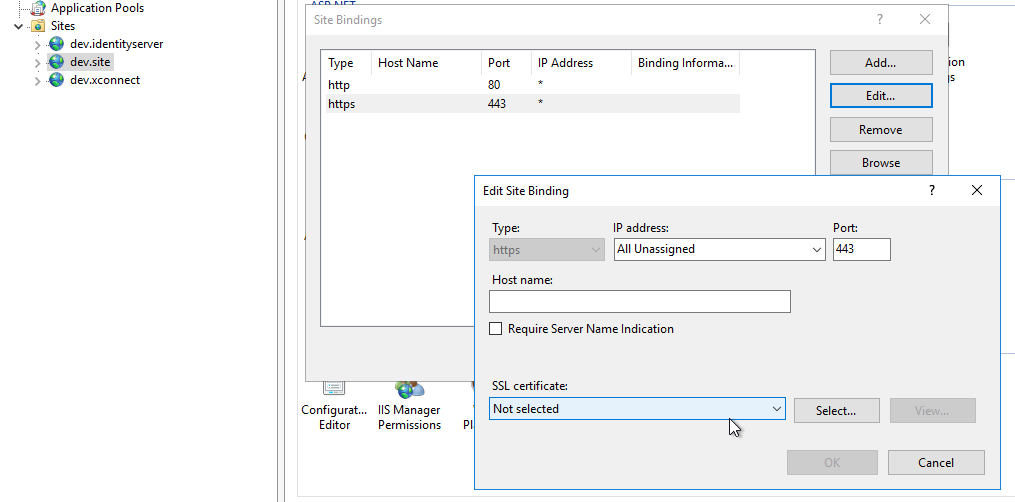
Open IIS and edit the secure bindings for your sites Ports (442-444 if you followed my guide). Select the new certificate and close the dialogues.
Edit the three files listed above so the new thumbprint is in place, save them, and you're done! Visit your site and check the certificate, and logs (for errors) to validate the change.